
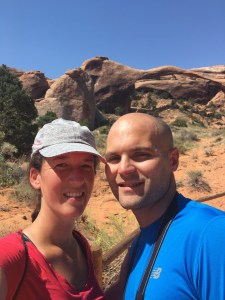
The Island in the Sky section of Canyonlands gives you views of the Colorado and Green Rivers, beautiful overlooks and unique points of interest like Whale Rock and Upheaval Dome. Of course, a stop here wouldn’t be complete without photographing Mesa Arch.
Canyonlands National Park Highlights on Sunday, September 3, 2017
- Mesa Arch
- Grand View Point Overlook
- Buck Canyon Overlook
- Upheaval Dome
- Whale Rock
- White Rim Overlook (sign reads “Hiking Trails”)
Sleeping in the car has its advantages! After the financial savings, the next biggest is once you’re awake, you can start moving right away without delay. We followed the GPS and took the most direct way from the Grand Canyon to Canyonlands. We retraced some steps by driving back through Kanab, passing Zion, Bryce and arrived across the street from Arches National Park after 5 hours. One thing to note is we lost one hour when we crossed back into Utah from Arizona. The other most important thing to note is the drive on I-70 is exhausting. There are signs reminding drivers to stay hydrated and to pull over if necessary. This road allows you to legally drive 80 mph! Make sure you have water and gas before making this long drive because there aren’t many options.
It is super important to know that Canyonlands has two completely different park sections and they are not close to one another. The section in the north that is relatively close to Arches National Park is called Island in the Sky (this is the section we went to) and the section in the south is called The Needles. Similar to the other national parks, it’s worth stopping at the Visitor Center to talk with a ranger, use the facilities and get a map. We experienced a cool small world connection here where the ranger’s son lives in Virginia and went to George Washington University for undergrad, which is the same school Mike and I attended for graduate school. If you want to check out a map ahead of your trip, here’s a good one: https://www.nps.gov/cany/planyourvisit/upload/canymap.pdf
We stopped at the most notable place, Mesa Arch first. Since we arrived in the early afternoon, it was extremely hot out so we loaded up with sunscreen and wore our hats.

Mesa Rock is particularly popular for sunrise and sunset views, but it was nice even in the middle of the day. You can hike around the arch, pose for a picture in the archway or use the arch as a frame for what’s beyond. Once we were back in the car, we continued to the fork in the road and headed left. We popped out at the Orange Cliffs Overlook and then continued to the Grand View Point Overlook.
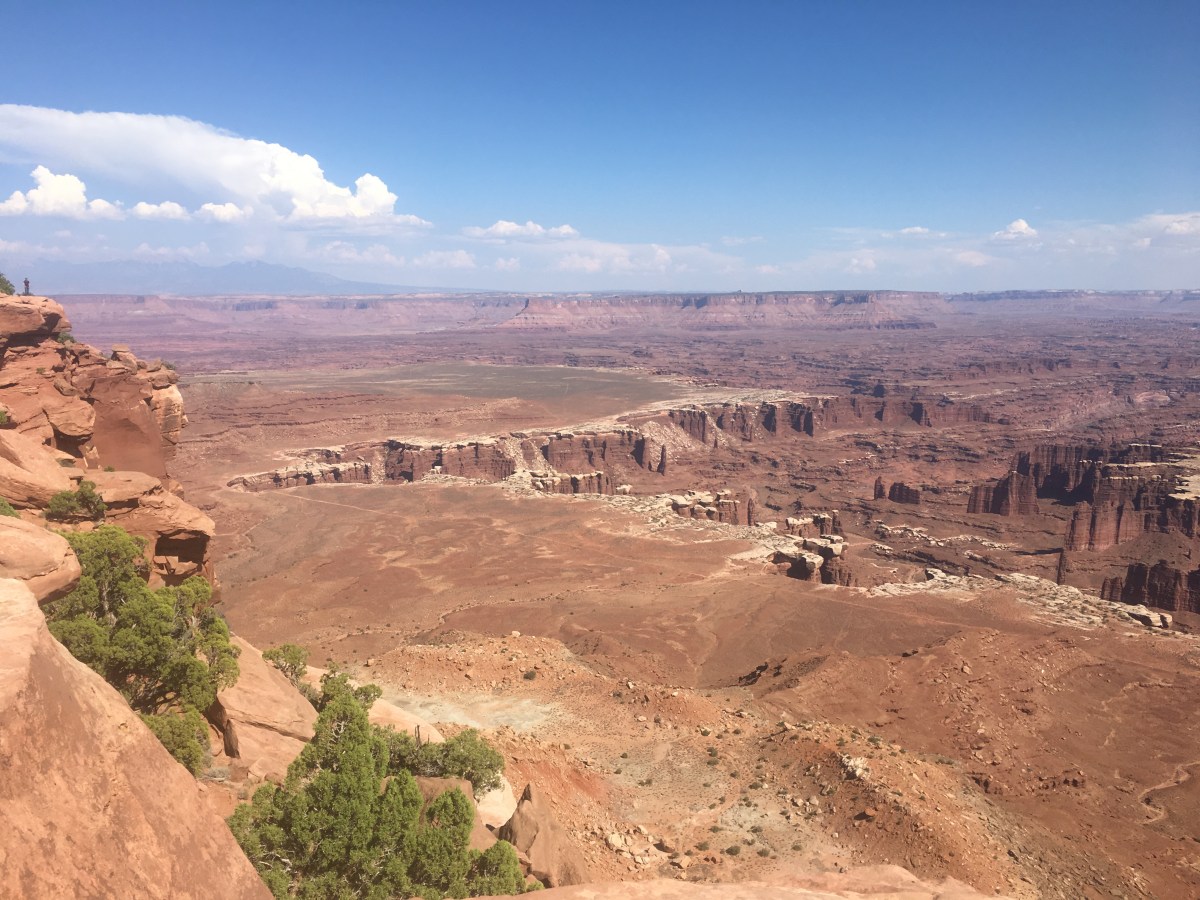
This is a great spot to catch a glimpse of the Colorado River and to try to find a car or two driving below you on White Rim Road. We found a white SUV that looked like a speck. On your drive back to the fork, Buck Canyon Overlook is another good point of interest if you want to hop out of the car and take a few pictures.
The main road wasn’t busy, so we drove back to the fork and headed left. We got out of the car at the Aztec Butte for a quick picture, but didn’t hike here. Instead, we drove to the end of the road and stopped at the Upheaval Dome. There are two theories about the upheaval dome – personally, I like the meteorite theory. If you’re interested in learning more, you can check out the NPS site.

The trail here is relatively short and has a moderate incline to a good viewing point. We followed the signs to the “First Overlook”, since that’s what the ranger at the visitor center recommended.
Retracing our drive, we stopped at Whale Rock on the left. This hike is not only extremely fun with excellent views from the top, but there’s also legit cell phone service from the top! If you want to quickly send or receive text messages, this is the place. The hike to the top isn’t too difficult, but paying attention to the cairns is important (stacked rocks that serve as guide posts), especially when it’s hot and easy to get disoriented.

Once you’re at the top, the large rocks provide some shade as well. Before the fork in the road, we stopped at the Green River Overlook for a view of the other river.
Since the ranger told us her favorite spot was the White Rim Overlook, we knew we had to go check it out. This is back on the original road as if you’re heading toward the Grand View Point Overlook, but it’s on the left and the sign only reads “Hiking Trails”. In other words, it’s well hidden until you park and find the trailhead sign that indicates the white rim overlook mile level walk is only 0.8 miles away. This place is so cool! There are huge imprints in the rock that look like dinosaur prints. This is another trail that requires paying attention to the cairns. We headed out close to sunset and were rewarded with incredible views. We had the place to ourselves, which was perfect, until the sun went down and we found ourselves here, in the dark, with only our dying phone flashlight to help us find the cairns.

We were thankful when we made it back to the car and came across a deer on our drive heading out of the park. We stopped at the closed visitor center to refill our water bottles and found there were tons of bats guarding the entrance. This was a bit scary. We took our time driving out of the park, cognizant that animals could appear anywhere and made our way back to I-70 east toward Colorado. We drove about two hours to Parachute, Colorado where we found a good rest station for the night with the best restrooms we had seen in days. In other words, these flushed!
Come with us to the White River National Forest near Aspen tomorrow to see one of the most photographed places in all of Colorado – Maroon Bells! From here we will take you to the 7th and final national park of our trip!

 From here we took the shuttle from Canyon Junction (#3) to Zion Lodge (#5). We went to the road and followed the signs to the Emerald Pools. The walk is quite steep and the lower and upper falls were our favorite. When you leave the middle level emerald pool, take the Kayenta Trail. This will take you to the Grotto (#6) and gives you fabulous views of the Virgin River.
  Keep your eyes peeled – we looked down at the river and spotted a deer standing in the water taking a drink. We saw tons of wild turkey at the Grotto. There’s also a place to fill up your water bottles and use the facilities here. If you’re up for the challenge, you can complete the strenuous hike up Angel’s Landing.
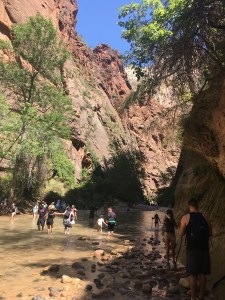
 Considering it was the heat of the day when we hiked, we didn’t see many others on this trail, but we got lucky at the end and saw a grey fox!
 Before making a stop, the park doesn’t appear to be that impressive. It’s probably because you don’t realize you’re driving along a canyon until you actually pull into a parking lot and look over the edge. As we continued toward the end of the road to see Rainbow Point, we pulled into the lots at Aqua Point and Ponderosa Point to take in these views. If you have the better part of a day and don’t plan on doing extensive hiking, you’ll have time to stop at each point of interest.
 Make sure to take some time to hike here. An easy, short trail is the Bristlecone Loop which is about 1 mile. If you’re lucky, you’ll see a Peregrine Falcon diving into the canyon (we were not). We did, however, see some of the largest ravens we’ve ever seen searching the picnic grounds for scraps.
 Hoodoos are the skinny and tall rock formations that you see everywhere at this park. The walk along the rim in the direction of Inspiration Point is definitely worth it. There is so much to take in at this particular stop. If you’re short on time, drive to Inspiration Point (or take the shuttle). We arrived to two deer grazing here and then headed to the rim to see the sun hitting the red rocks. If you’re up for the challenge, climb the steep hill to get the best vantage point from the top. While we did not use
  To end our time at Bryce Canyon National Park, we parked at Sunset Point. The walk between Sunset Point and Sunrise Point is incredible. If you have the right shoes and are up for the challenge, take a hike into the canyon. We enjoyed walking the rim of the canyon, spotting the pretty blue birds and watching the sun start to set and illuminate the rocks. We also spotted Thor’s Hammer, which is one of the better known and photographed hoodoos. As we awaited the sunset, fancy photographers gathered to find the best spots to capture the lighting change as the sun went down.


 The way the light hits the colorful rocks is incredible. A bit farther up the road, which is windy, rocky and narrow, we made it to a small parking lot by Goosenecks Overlook and Sunset Point. The Goosenecks Overlook was our first time looking into a canyon and it is breathtaking.
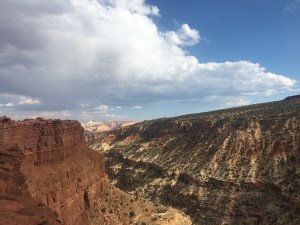
 We had to drive very carefully as we saw many deer along the road near the campsites. It is cool to reflect that we ended up seeing deer at six out of the seven national parks that we visited during our vacation. We drove along the Scenic Drive until we made it to the signs that read Capitol Gorge. We didn’t exactly know what we were in for either. This is an extremely narrow and scary drive.
 The beginning of the hike is very easy and relatively flat along the river. Then there is quite a steep climb before reaching a point before you then start walking down again. We saw lots of playful chipmunks and a few amphibians, but no snakes thankfully! The arch is awesome once you arrive. Enjoy calling out so you can hear your voice echo back. Once you go under the arch, we found it challenging to find and stay on the path, but fortunately made it around the loop as the sign recommended (counterclockwise direction).

 If you arrive before the park opens, there’s no one at the gate, however, if you plan on seeing multiple National Parks, it’s worth spending the $80 to get the
  One benefit of starting early is you’re likely to beat the tour busses that are bound to come and stop at these points of interest. Balanced Rock is perfect for taking a short stroll and stretching your legs from the car ride.
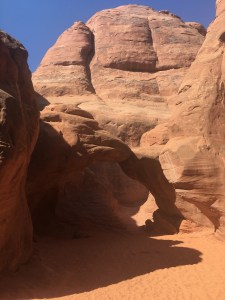


 This little trailer coffee shop offered delicious iced lattes with unique flavor combinations.